
Few program should be installed on your PC, before we start the customizing of own skin, These are:
| Symbian SDK |
Oggplay binaries |
|
| Series60 |
Forum Nokia | S60 CW binaries |
| Series80 |
Forum Nokia |
S80 CW binaries |
No niin ! Everything should be in place, we're almost ready to
edit our first skin.

| Index in MBM | OggPlay mandatory bitmaps | Name |
bitmap |
| 0 | Track icon |
Image00.bmp |
 |
| 1 | Track icon mask | Image01.bmp |  |
| 2 | Album icon | Image02.bmp | |
| 3 | Album icon mask | Image03.bmp | |
| 4 | Artist icon |
Image04.bmp | |
| 5 | Artist icon mask | Image05.bmp | |
| 6 | Music type icon | Image06.bmp | |
| 7 | Music type icon mask | Image07.bmp | |
| 8 | Folder icon |
Image08.bmp | |
| 9 | Folder icon mask | Image09.bmp | |
| 10 | File icon |
Image10.bmp | |
| 11 | File icon mask | Image11.bmp | |
| 12 | "go back" icon |
Image12.bmp |  |
| 13 | "go back" icon mask | Image13.bmp |  |
| 14 | Play icon | Image14.bmp |  |
| 15 | Play mask | Image15.bmp |  |
| 16 | Pause icon |
Image16.bmp |  |
| 17 | Pause mask | Image17.bmp |  |
| 18 | Background image 1 |
Image18.bmp |  |
| 19 | Background image 2 | Image19.bmp | |
| 20 |
- |
Image20.bmp |  |
| 21 |
- |
Image21.bmp |  |
| 22 |
- |
Image22.bmp |  |
| 23 |
- |
Image23.bmp |  |
| 24 |
- |
Image24.bmp |  |
| 25 |
- |
Image25.bmp |  |
| 26 |
- |
Image26.bmp | |
| 27 |
- |
Image27.bmp | |
| 28 |
- |
Image28.bmp | |
| 29 |
- |
Image29.bmp | |
| 30 |
- |
Image30.bmp | |
| 31 |
- |
Image31.bmp | |
| 32 |
- |
Image32.bmp | |
| 33 |
- |
Image33.bmp | |
| 34 | Play icon | Image34.bmp |  |
| 35 | Play icon mask | Image35.bmp |  |
Remarks: Note that there exists two background image. This is a feature of the UIQ version of OggPlay where the screen size can change if the cover is open or closed. In Series 60, what mainly interests us is background image 2, but for good measure, we'll put the same image in index 18 and 19. Also it should be observed that the play icon and it's mask exist two times, in indexes 14-15 and 34-35. This used to be an OggPlay bug. For compatibility reasons, we will defined both twice, that way we can make sure that the skin will run on any version of Oggplay.
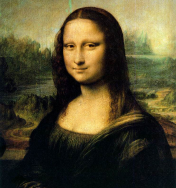
Let's change that ugly background for something
else. Let's put in the background "La Joconde". Here is the bitmap we'll use.
Unfortunately, MbmWhizard doesn't allow us directly to modify the
bitmaps through the UI. We will use a symbian tool to generate the new
mbm file that will contain all the bitmaps of the original mbm + our
modified background bitmap.
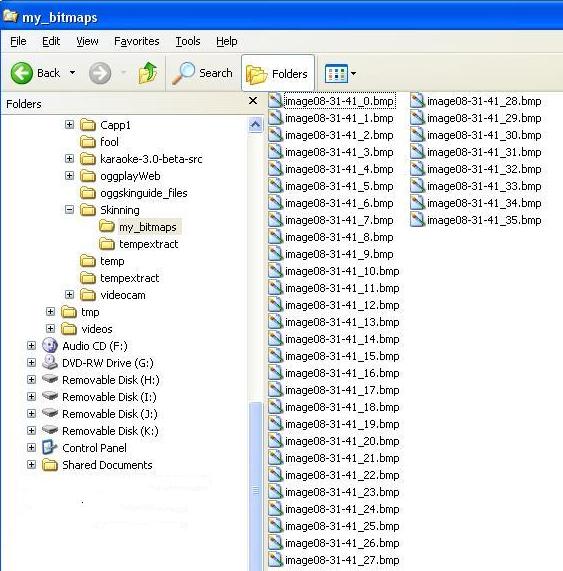
First step is to extract all the bitmaps from the original mbm. We'll
use mbm Whizard
for this. Mbm Whizard saves it's temporary files to a directory called tempextract. That directory is
located in the same directory than the mbmwhizard.exe. Here is what
should be done to extract the bitmaps:
| Before Renaming |
 |
| After renaming |
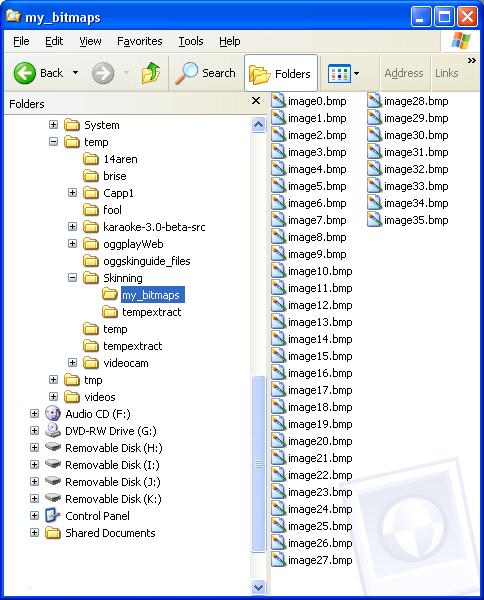 |
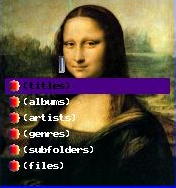
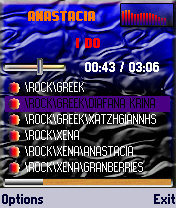
Try it in the emulator ! Copy the mbm file to EPOCROOT\epoc32\release\winscw\UDEB\z\system\apps\OggPlay\deviant.mbm and start the emulator. You should get something similar that what you see above.
Changing the background is a quite forward task, since the background doesn't interact with anything: it's just there. But or each interactive objects, we need to give a little bit more information to Oggplay : we have to define a mask. The masks are useful for transparency reasons. They tell to OggPlay which pixels should be drawn and which pixels should be transparent. There is no mask needed for the background picture, since the background is not allowed to be transparent. In the following table, objects and their corresponding masks are drawned.
| Description | object | mask |
| Frequency bar |  |
 |
| Volume sprite |
|
|
| Song Position Bar |  |
 |
| "go back" Icon |  |
 |
| pause icon |
 |
 |
Basic Elements
The skn file a text file which contains the
indications how OggPlay should manage the pictures in the MBM file. OggPlay is very pedant about the syntax, any single error
(like an empty line) and the skn will be rejected. This is why it
is much easier to always modify an existing skn file. Since this is a
text file, it is going to be much easier to fiddle with this file.
Let's start ! Open the deviant skn file
with your text editor EPOCROOT\epoc32\release\winscw\UDEB\z\system\apps\OggPlay\deviant.skn.
The syntax of the skn file is described in http://symbianoggplay.sourceforge.net/OggPlaySkinningGuide.html but for this tutorial, we'll just introduce the concepts of the skn files. .
Common attributes of objects
Color: This
attribute is mainly used with objects that contains text. The name
differs depending on the object (
FontColor, FontColorSelected etc). The color is
defined using RGB values, each component can take a value between
0-255. For example
the red colour is defined as 255.0.0
the green colour is defined as 0.255.0
the blue colour is defined as 0.0.255
the white colour is defined as 255.255.255
the black colour is defined as 0.0.0
Most paint programs let you know the RGB value of a
certain color.
Position (place and dimensions): The position is represented by two pairs of numbers. The first pair is the position x,y of the top corner of the object, while the second pair the is the dimensions of object.
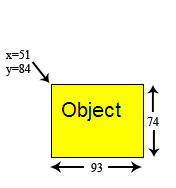
So the picture above would be
51,84,93,74.
Font : For text object, the font can be specified. Through this, it can be also specified whether the font is bolded or not. The syntax is as follow: the name of the font, followed by the size of the font and finally a number telling whether bold text should be used (1 if bolded, 0 if not). For example "Font LatinBold12 7 1" tells Oggplay to use the bolded font LatinBold12 with size 7 . Following table shows all the fonts that can be used in Series60 (Siemens SX-1).
| Font | Possible Sizes ** | Attribute |
|
| Regular | Bold | ||
| LatinBold12 | 7 |  |
 |
| LatinBold13 | 8 |  |
 |
| LatinBold17 | 10 |  |
 |
| LatinBold19 | 11 |  |
 |
| LatinPlain12 | 7 |  |
 |
| Alpi12 | 7 |  |
 |
| Albi12 | 7 |  |
 |
| Alp13 | 8 |  |
 |
| Alpi13 | 8 |  |
 |
| Albi13 | 8 |  |
 |
| alp17 | 10 |  |
 |
| Alb17b | 10 |  |
 |
| albi17b | 10 |  |
 |
| alpi17 | 10 |  |
 |